

Core Quickstart
If you're not using React, but still want a number of the abstractions that make the React package so easy to use, you can leverage the @account-kit/core package directly.
In this guide, we'll walk you through how to use this package to send a user operation, while using the reactive utilities exported by this package.
Install packages
Prerequisites- minimum Typescript version of 5
- pin viem to 2.20.0 (
yarn add [email protected]) - pin wagmi to 2.12.7 (
yarn add [email protected])
To get started, you'll need to install the required packages. We also install the infra package because it contains the necessary Chain definitions that makes it easier to setup
your a Bundler client.
yarn add @account-kit/core @account-kit/infraGet your API keys
-
Get your API key by creating a new app in your Alchemy Dashboard
-
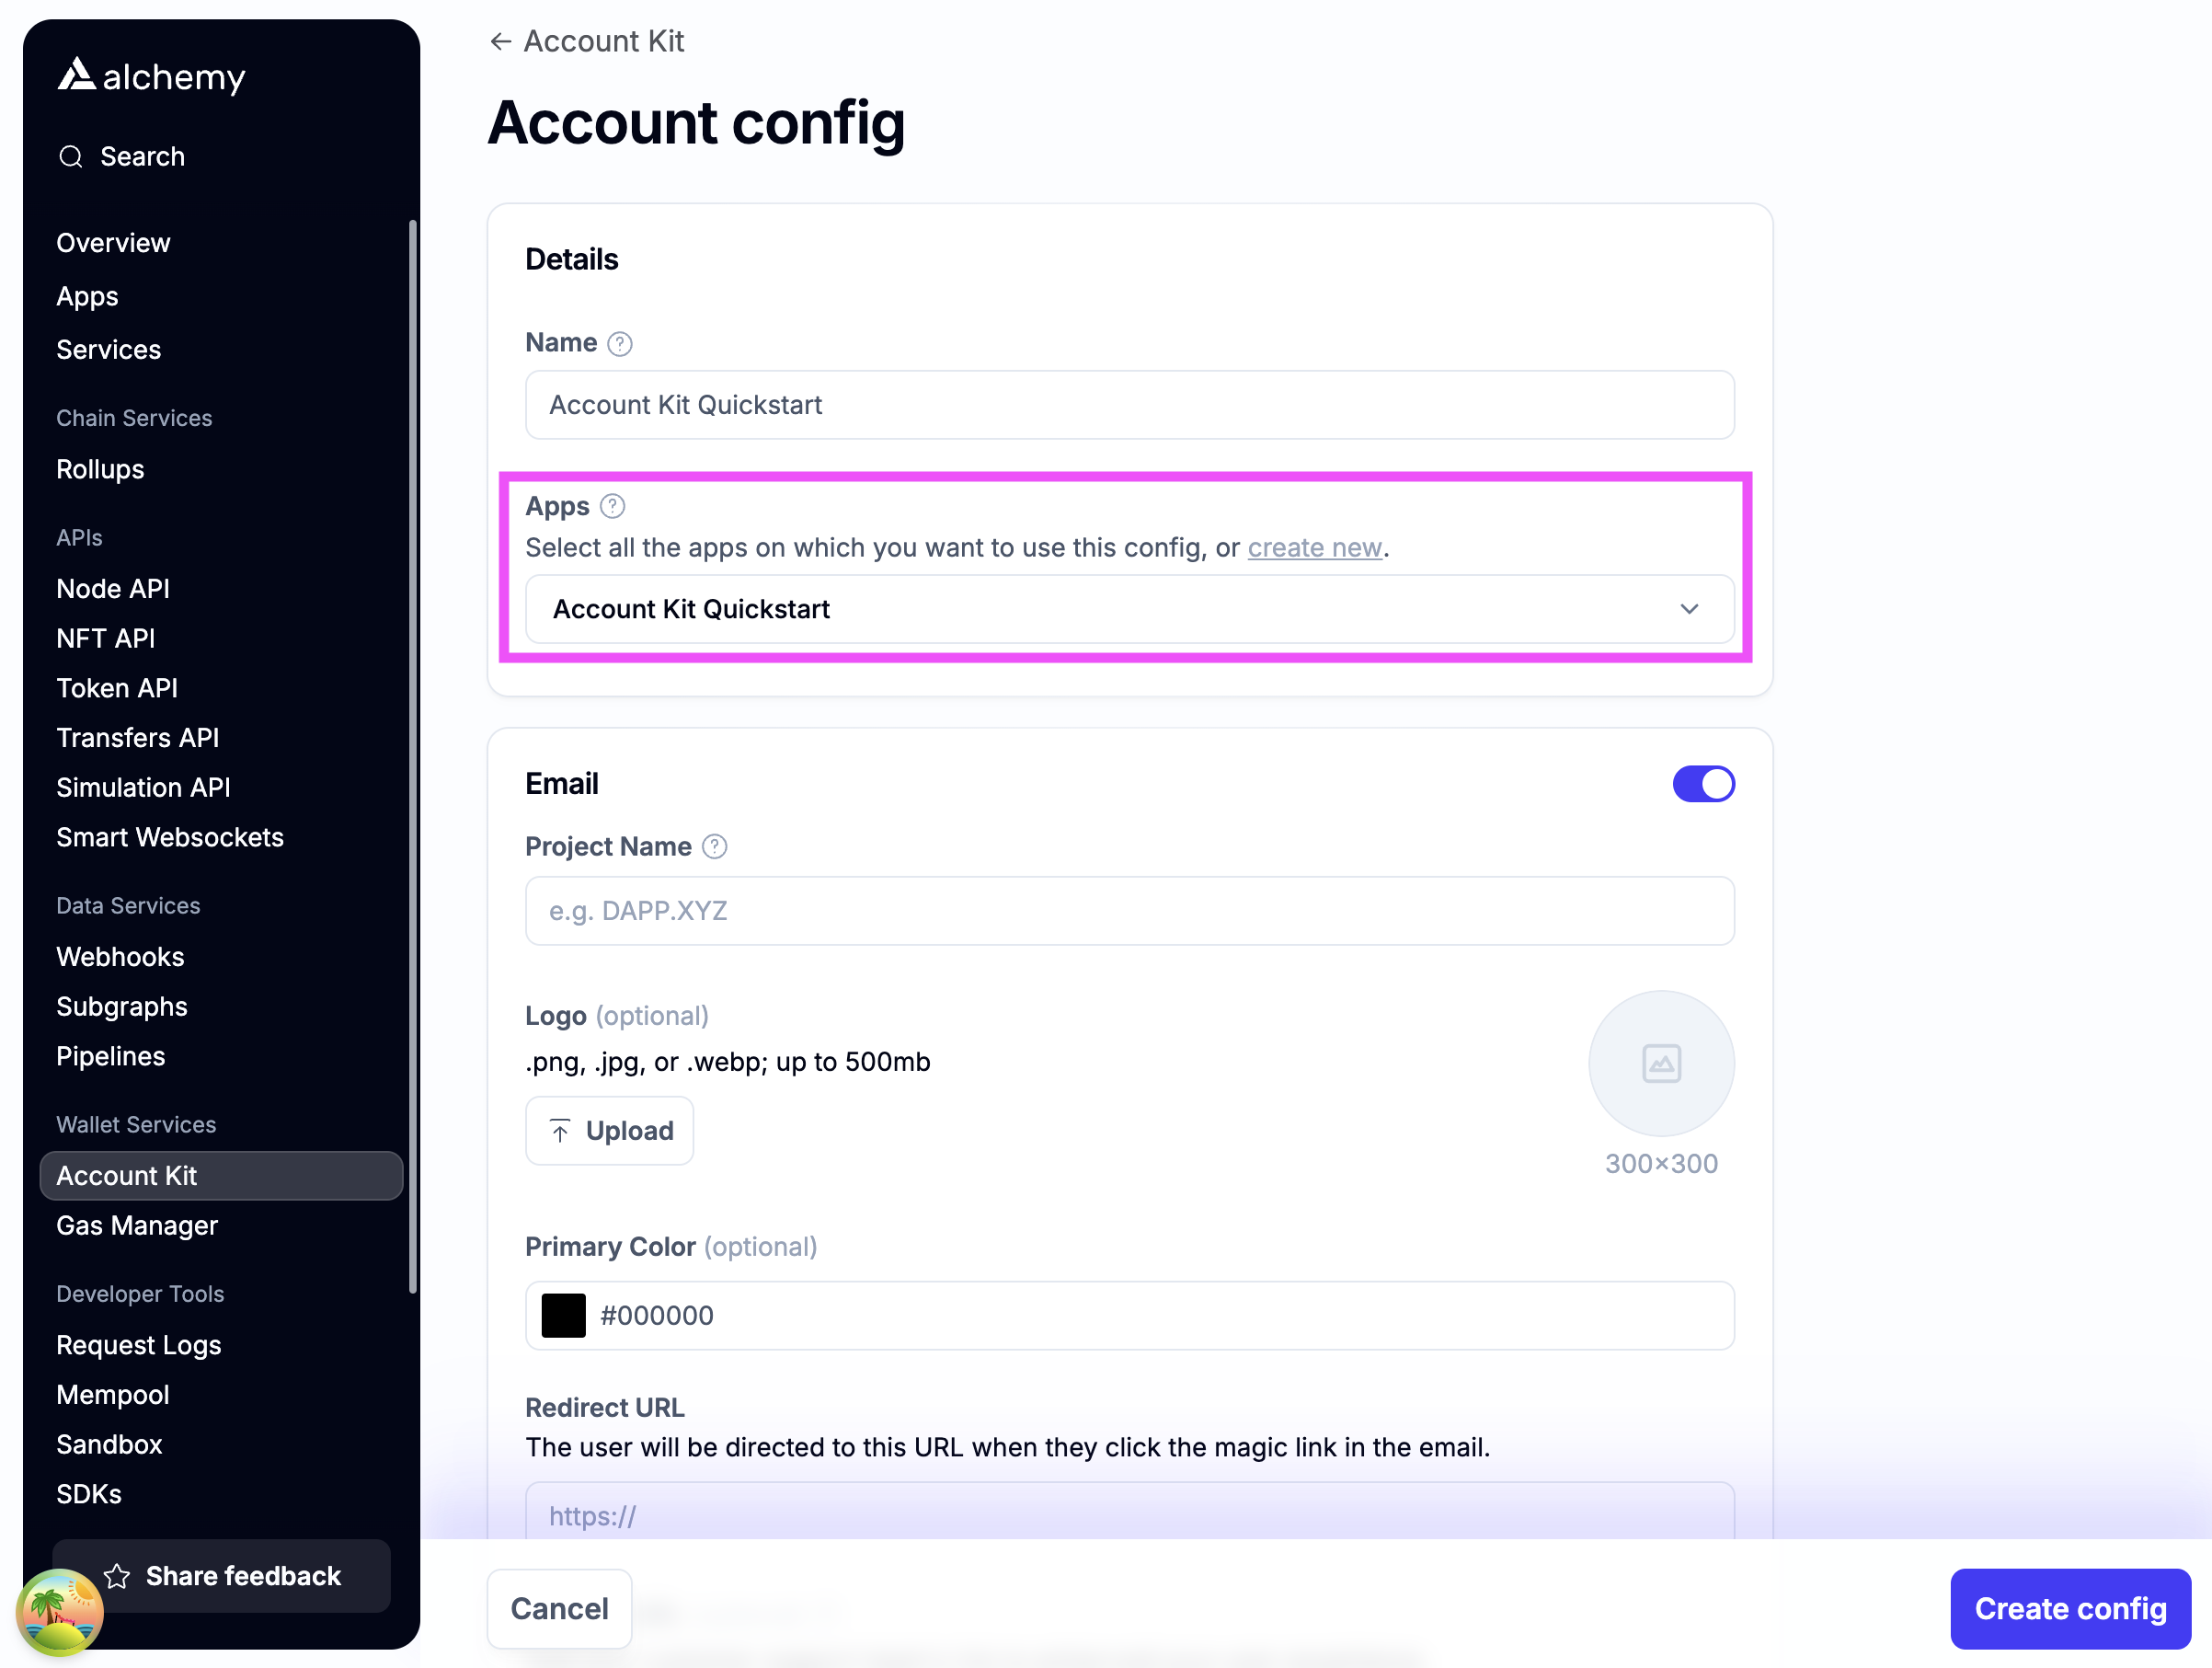
Create a new account config in your Account Kit Dashboard
-
Apply the config to your app from step 1
-
Enable authentication methods you want to support.
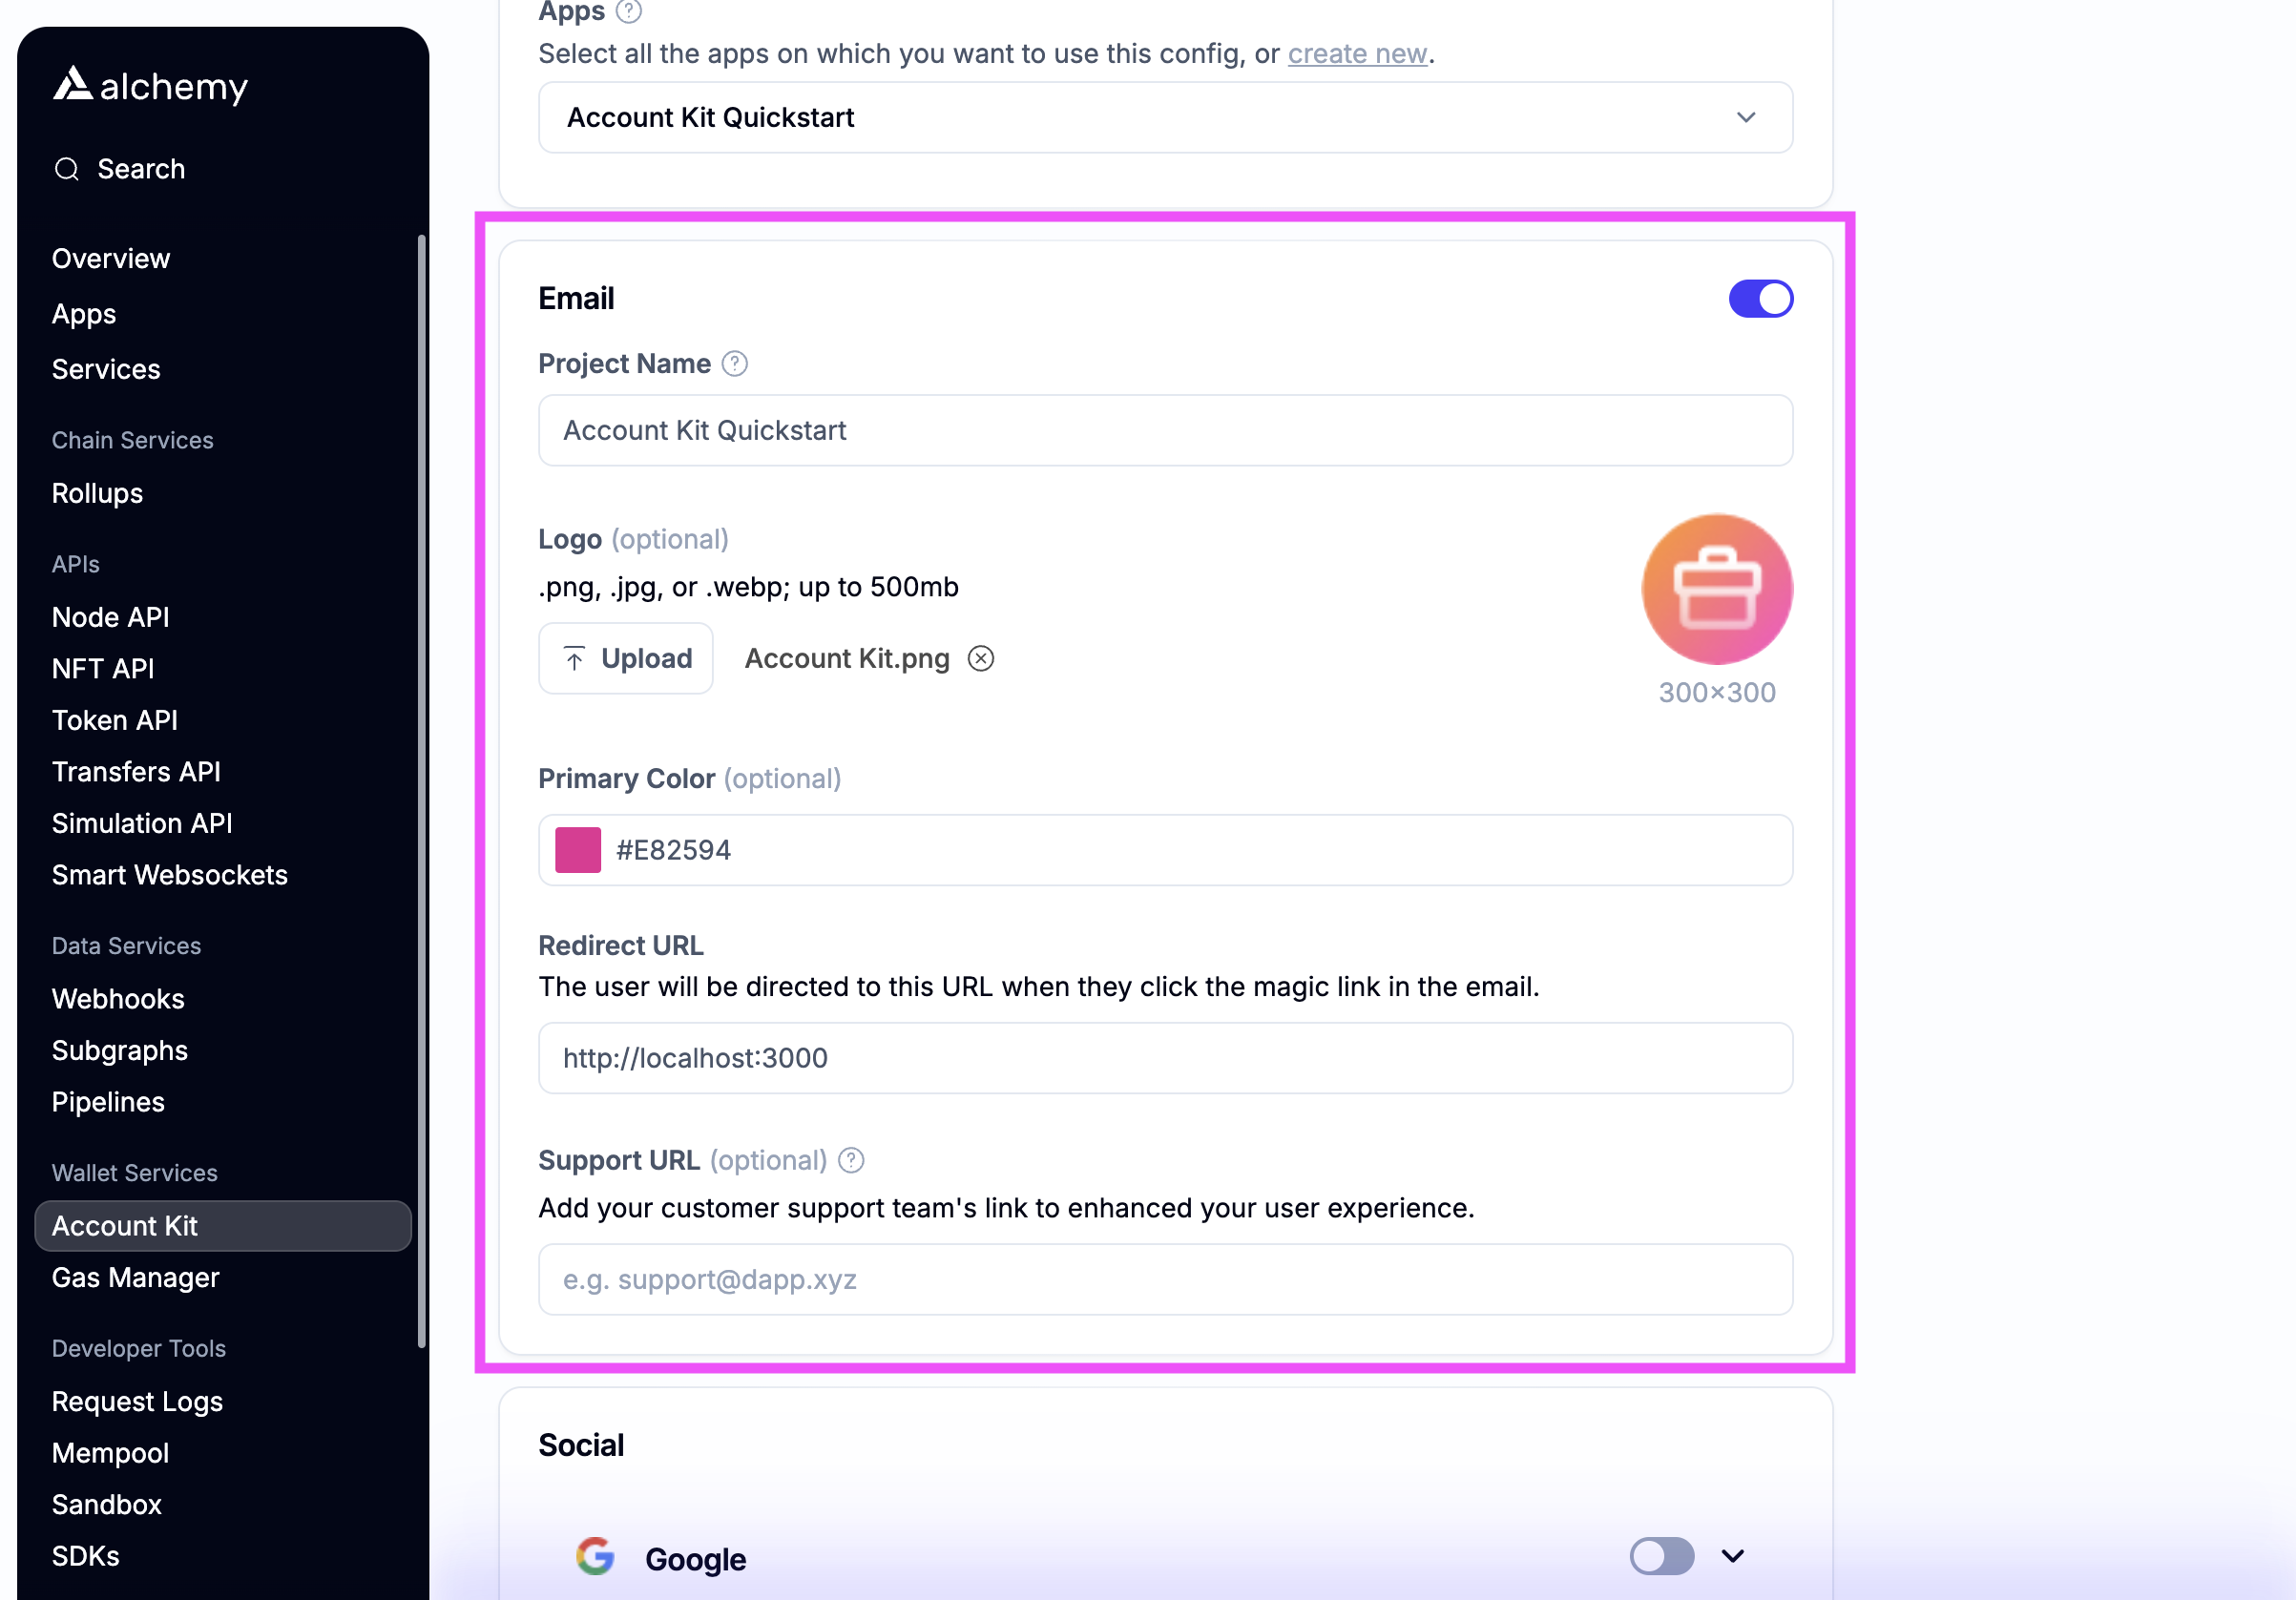
Email authIf you want to use email auth, toggle on email.
- For testing, use http://localhost:3000 as the Redirect URL (Note http not https)
- The user will be redirected to the Redirect URL if you use the magic link email flow
- Optionally stylize ✨ the email with your brand color and logo!
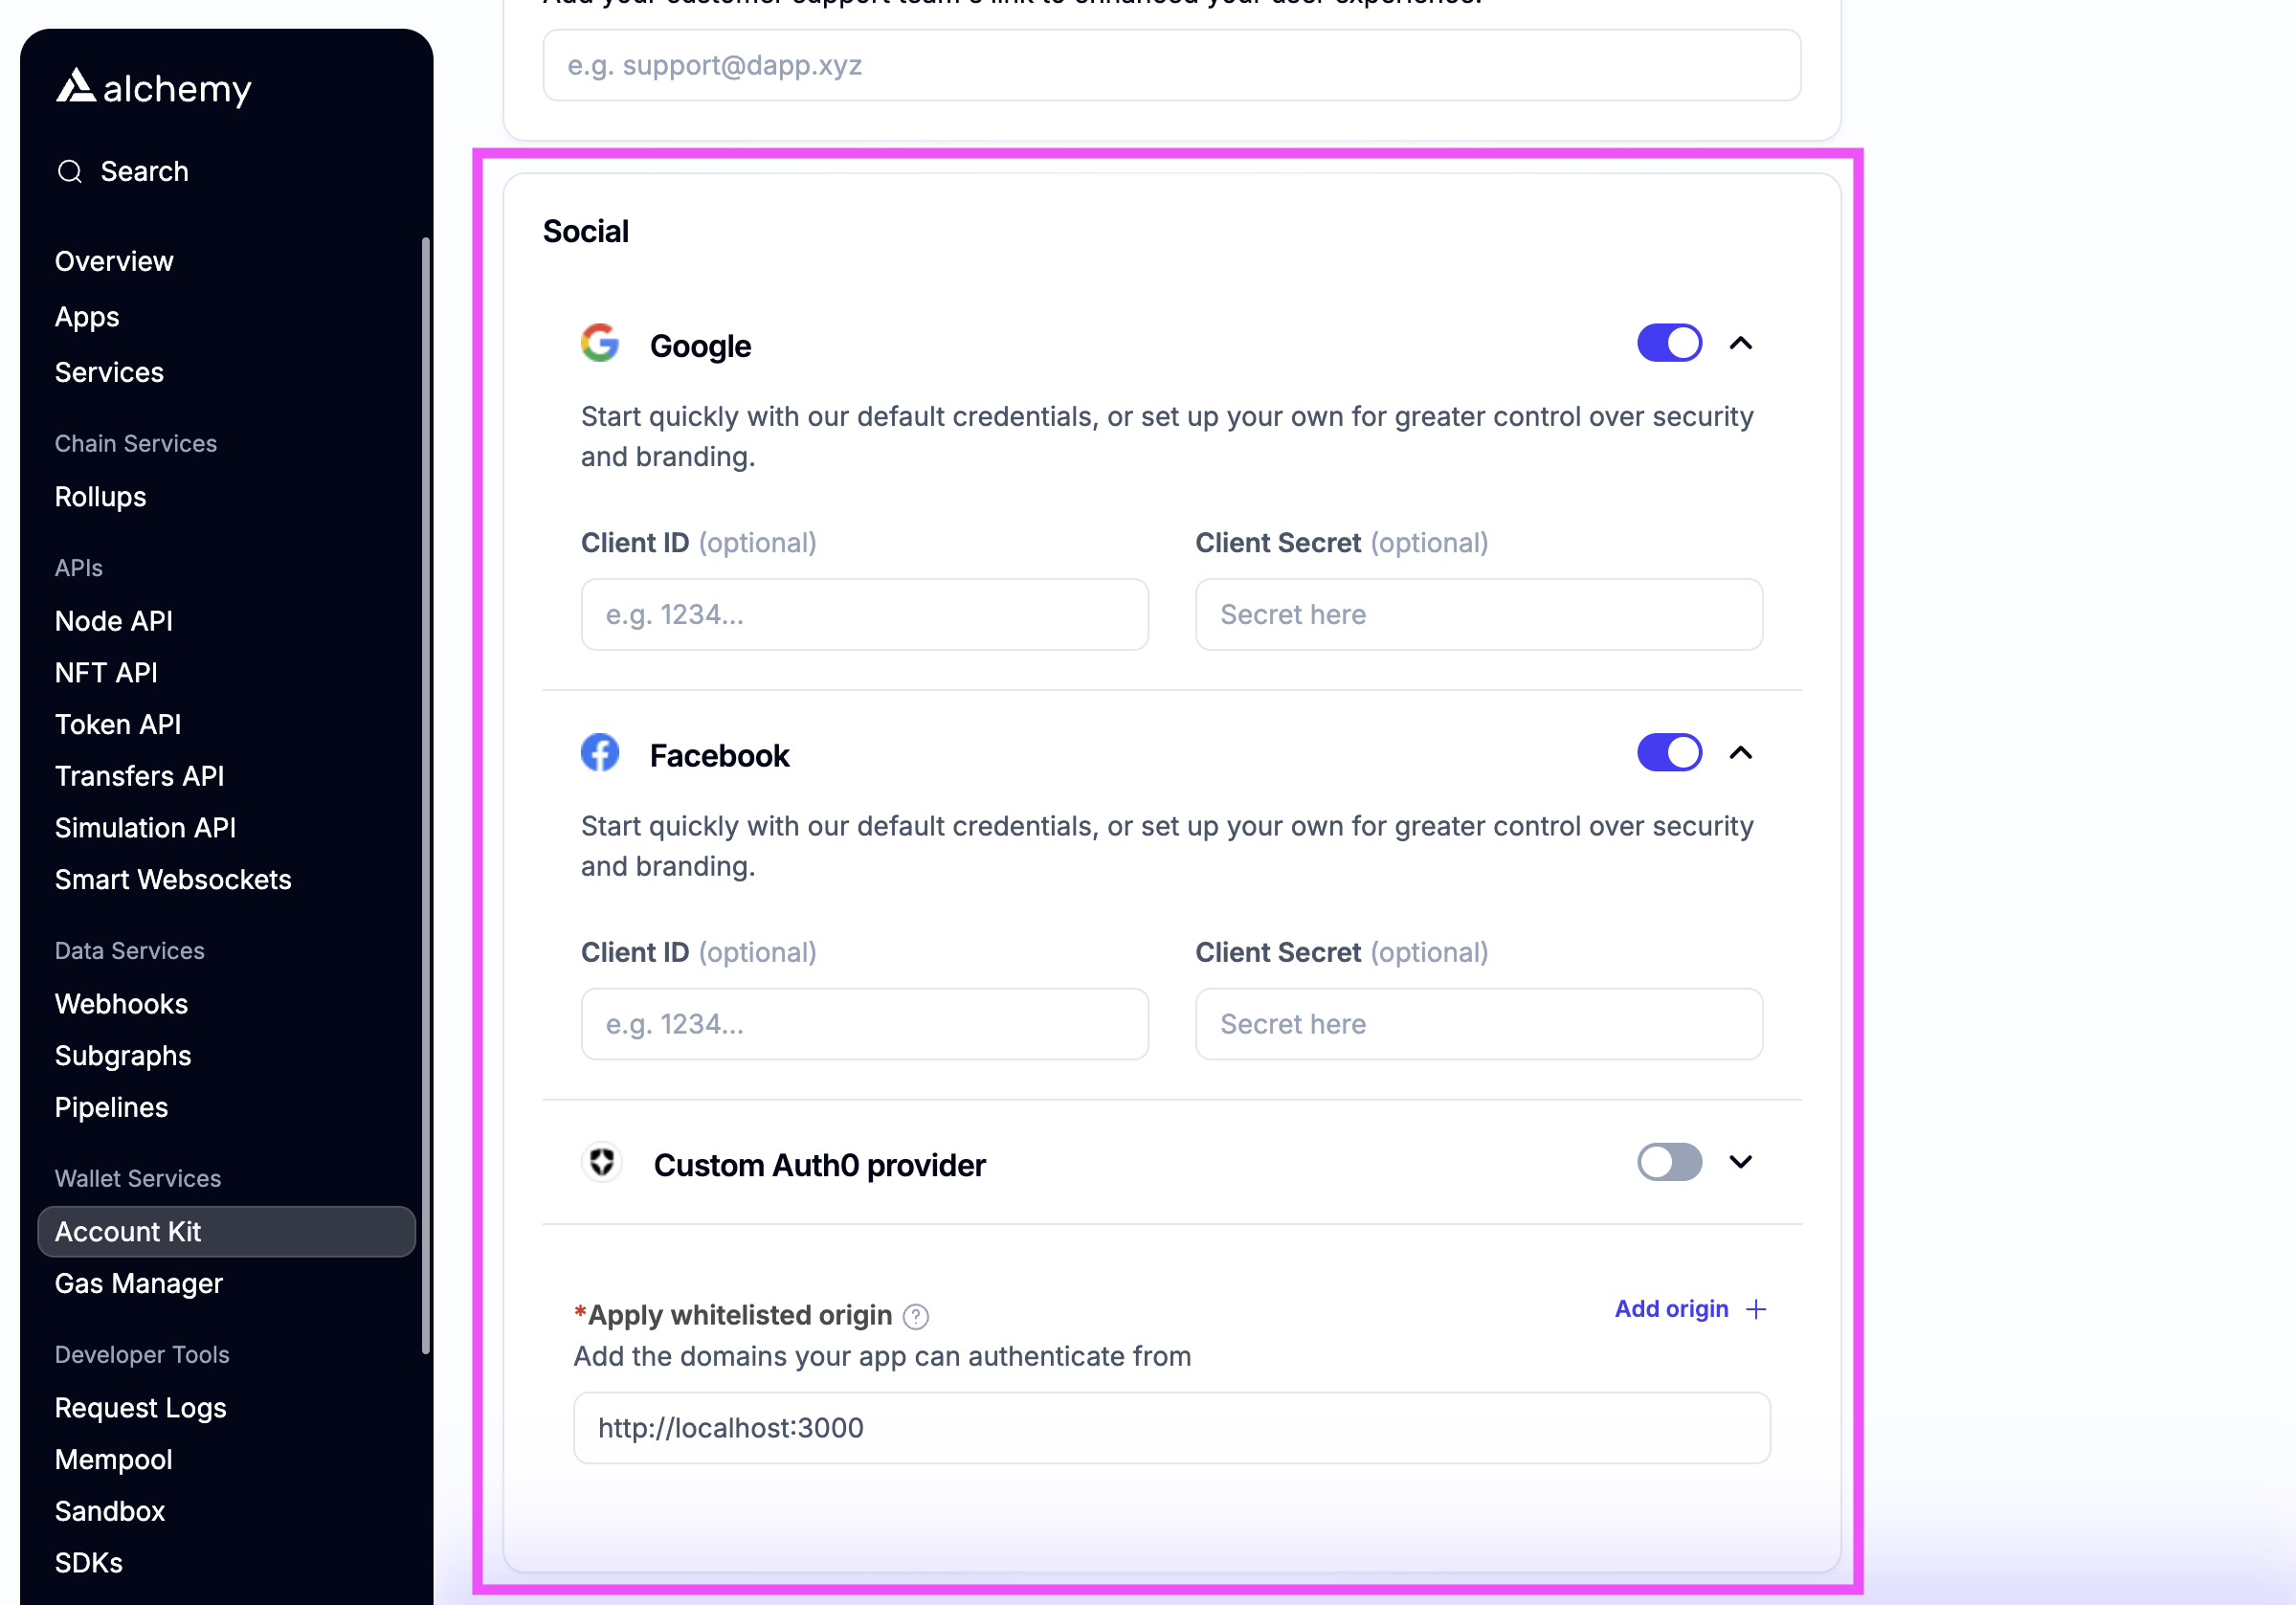
Social authIf you want to enable social login, toggle which auth providers you want to support.
-
For testing, add http://localhost:3000 as a whitelisted origin
-
Add the link that your dapp will be running on to the whitelisted origin list
-
Optionally enter your own OAuth credentials or use our defaults
-
-
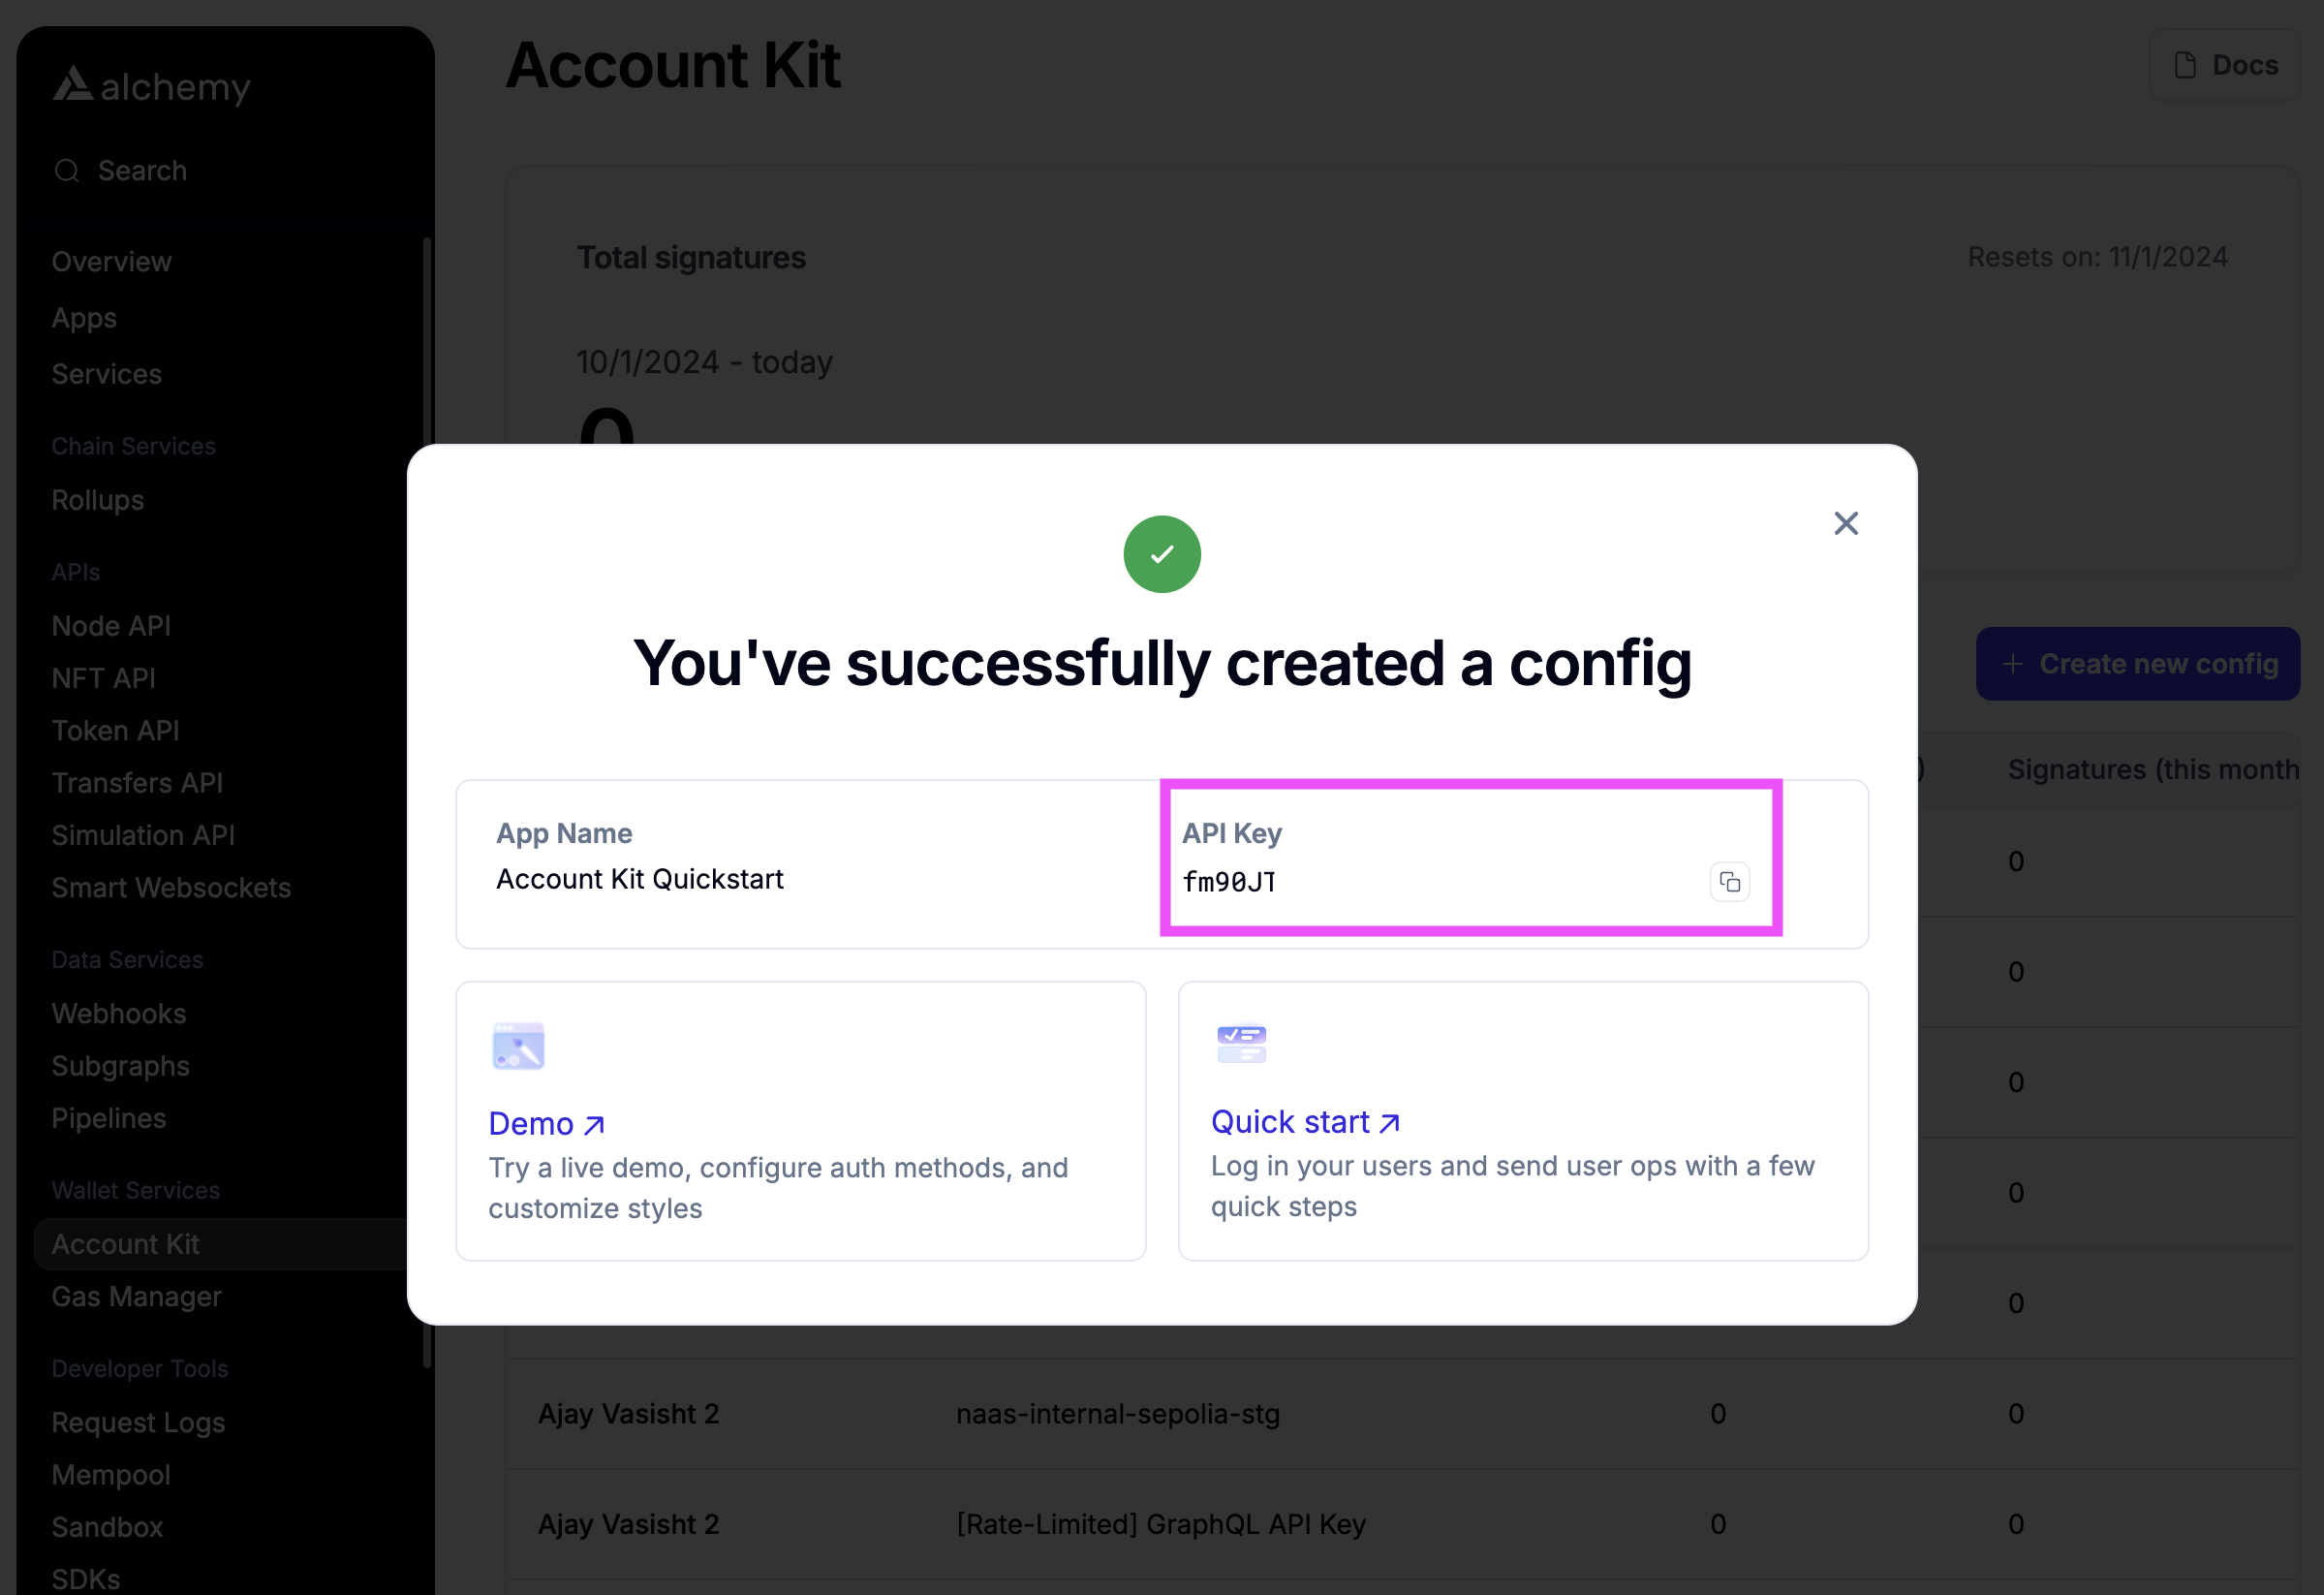
Create the config and copy the API Key
Create a config
Now, you're ready to create a config. The config we create should be a static object that you can import anywhere into your application. It contains all of the state that the functions within this package use.
import { createConfig } from "@account-kit/core";
import { alchemy, sepolia } from "@account-kit/infra";
export const config = createConfig({
transport: alchemy({ apiKey: "YOUR_API_KEY" }),
chain: sepolia,
// optional if you want to sponsor gas
policyId: "YOUR_POLICY_ID",
});Watch and Hydrate
The next step is to hydrate the account state, which will trigger watchSmartAccountClient, which call getSigner in its callback. This is crucial for ensuring that the signer is properly defined and ready.
If the client state is undefined, hydrate(config) is called to initialize the smart account client, updating the store with the necessary data (e.g., accounts, signer, chain).
This triggers a state update, which in turn calls the callback in watchSmartAccountClient.
Once the state is populated, the callback is executed, and the client data (such as signer status and accounts) becomes available.
Now, you can safely call getSigner(config) to access the signer, as the store state is now ready.
Without calling hydrate, the store might not be properly initialized, causing getSigner to return undefined.
To break it down:
-
watchSmartAccountClientsubscribes to state changes and invokes the callback whenever the smart account client's state is updated. -
hydrateis responsible for setting up the store and initializing the client. -
onMountperforms actions that need to happen only after the client-side component has been mounted and the component is fully ready and rendered.
import { config } from "./config.ts";
import { hydrate, watchSmartAccountClient, getSigner } from "@account-kit/core";
// How you actually store this state variable
// depends on the framework you're using
let clientState;
// The watch smart account client will handle all the possible state changes that can impact this client:
// - Signer status
// - Account instantiation
// - Chain changes
const clientSubscription = watchSmartAccountClient(
{
type: "LightAccount",
},
config
)((clientState_) => {
clientState = clientState_;
const signer = getSigner(config);
if (!signer) {
throw new Error("No signer found");
}
console.log("signer ready", signer);
});
if (clientState == null || clientState.isLoadingClient) {
console.log("Loading...");
const { onMount } = hydrate(config);
onMount();
}Authenticate the user
Before you can create a Smart Account instance for your users, you need to authenticate them with the user. Depending on what framework you're using this will look different, but using email based auth as an example you would:
- collect the user's email
- call the
authenticatemethod on the signer - handle the redirect from the user's email and pass the bundle to the signer to complete login
import { config } from "./config";
import { getSigner } from "@account-kit/core";
const signer = getSigner(config);
if (!signer) {
// this can happen if your rendering this on the server
// the signer instance is only available on the client
throw new Error("Signer not found");
}
// authenticate the user with email
await signer.authenticate({
type: "email",
email: "user@email.com",
});
// once the user has clicked on the email and been redirected back to your site
const bundle = new URLSearchParams(window.location.search).get("bundle");
if (!bundle) {
throw new Error("No bundle found in URL");
}
await signer.authenticate({ type: "email", bundle });Send a user operation
Now that you have your config, you can send user operations by leveraging the underlying smart account client.
import { watchSmartAccountClient } from "@account-kit/core";
import { config } from "./config";
let clientState;
// The watch smart account client will handle all of the possible state changes
// that can impact this client:
// - Signer status
// - Account instantiation
// - Chain changes
const clientSubscription = watchSmartAccountClient(
{
type: "LightAccount",
},
config
)((clientState_) => {
clientState = clientState_;
});
if (clientState == null || clientState.isLoadingClient) {
console.log("Loading...");
}
const client = clientState.client;
await client.sendUserOperation({
uo: {
target: "0xtarget",
data: "0x",
value: 0n,
},
});The key thing here is the watchSmartAccountClient method which allows you to subscribe to the state of signer and underlying account to give you a stable instance of the Smart Account Client. How you store the clientState variable will depend largely on
your framework, but the above example should give you a good starting point.